Intro
Overview
W3 Registrar is a specialized software system designed for blockchain identity registrars who need to verify and validate user identities across multiple platforms. It provides an automated solution for managing identity verification requests, handling cross-platform validation, and issuing blockchain-based identity judgements.
Purpose
The primary purpose of W3 Registrar is to streamline the identity verification process for blockchain networks, particularly focusing on:
- Automated verification of user identities across multiple platforms (Discord, Twitter, Matrix, etc.)
- Management of verification challenges and responses
- Integration with blockchain networks for identity judgement issuance
- Real-time status tracking of verification processes
- Secure storage and handling of verification data
Who Should Use This?
This software is specifically designed for:
Primary Users: Identity Registrars
- Blockchain network registrars who need to verify user identities
- Organizations providing identity verification services
- Entities responsible for issuing identity judgements on blockchain networks
Core Features
1. Multi-Platform Verification
- Supports verification across multiple platforms:
- Discord
- Matrix
- Display names
- Legal identities(out of scope)
- Web presence(tbd)
- GitHub accounts(tbd)
- PGP keys(tbd)
2. Automated Challenge-Response System
- Generates unique verification challenges
- Handles automated response validation
- Manages verification status tracking
3. Blockchain Integration
- Direct integration with substrate-based blockchain networks
- Automated judgement issuance
- Support for multiple verification states (Pending, Done)
4. Real-Time Communication
- WebSocket-based real-time status updates
- Matrix bot integration for automated verification
- Redis-based state management
5. Security Features
- Secure token generation and validation
- Encrypted storage of verification data
- State persistence and recovery mechanisms
Technical Architecture
The system consists of several key components:
- WebSocket Server: Handles real-time communication with clients
- Matrix Bot: Manages automated verification through Matrix
- Node Listener: Monitors blockchain events and handles registration requests
- Redis Backend: Manages state and verification data
- Blockchain Interface: Handles interaction with the substrate network
Benefits
For Registrars:
- Reduced manual verification workload
- Automated cross-platform validation
- Streamlined verification workflow
- Real-time status monitoring
- Secure and compliant verification process
For the Network:
- Improved identity verification reliability
- Faster verification processing
- Reduced verification errors
- Enhanced security and trust
Setting Up Bridges via Matrix
This guide explains how to set up messaging bridges to connect different adapters through Matrix.
Quick Setup with Beeper (Easies)t
The easiest way to set up bridges is using Beeper's client, which includes built-in bridge functionality and is hosted by Beeper. Even bridge is not self-hosted, all messages are e2ee, so messaging data on the server side is encrypted.
Initial Setup
- Create an account at beeper.com
- After registration, you'll receive a secret key - make sure to save this securely
- Log in to app.element.io using your Beeper account
- Set up a password for your account (required for bridging):
- Use Element web client to set/reset your account password
- Store this password securely - you'll need it for bridge connections
Bridge Configuration
Discord Bridge
- Connect your Discord account through Beeper
- Important Discord-specific steps:
- Ensure you're in the same channels as people who need to message you
- Configure your Discord privacy settings to allow direct messages
Twitter Bridge
- Connect your Discord account through Beeper
- Important Discord-specific steps:
- Ensure you're in the same channels as people who need to message you
- Configure your Discord privacy settings to allow direct messages
Advanced Self-Hosting Options
For registrars interested in self-hosting, these options are available:
-
Setting up your own Synapse server with mau.fi bridges
-
Using beeper/bridge-manager with your own Matrix Synapse server
Both options require:
-
More technical expertise in Matrix server administration
W3Registrar backend setup
Prerequisites
- Redis server (not needed for Docker setup)
config.toml(copy fromconfig.example.toml)- Matrix account credentials
1. Docker Setup
- Create configuration:
cp config.example.toml config.toml
# Edit config.toml with your settings
# Important: use "redis" as host in [redis] section
- Run services:
docker compose up -d
2. Binary Installation
- Create service user:
sudo useradd -r -s /bin/false w3r
sudo mkdir -p /etc/w3registrar
sudo chown -R w3r:w3r /etc/w3registrar
- Install binary:
# Download from releases page
# https://github.com/rotkonetworks/w3registrar/releases/
sudo cp w3registrar-* /usr/local/bin/w3registrar
sudo chown w3r:w3r /usr/local/bin/w3registrar
sudo chmod 755 /usr/local/bin/w3registrar
- Configure:
sudo cp config.toml /etc/w3registrar/
sudo chown w3r:w3r /etc/w3registrar/config.toml
sudo chmod 600 /etc/w3registrar/config.toml
- Create systemd service:
sudo tee /etc/systemd/system/w3registrar.service << EOF
[Unit]
Description=Identity Registrar Service
After=network.target redis.service

[Service]
Type=simple
User=w3r
Group=w3r
ExecStart=/usr/local/bin/w3registrar
Restart=on-failure
Environment=RUST_LOG=info

[Install]
WantedBy=multi-user.target
EOF

sudo systemctl enable --now w3registrar
3. Building from Source
# Install dependencies
sudo apt install -y build-essential pkg-config libssl-dev git

# Build
git clone https://github.com/rotkonetworks/w3registrar.git
cd w3registrar
cargo build --release

# Follow binary installation steps 1-4 above
Configuration Example
[registrar]

[registrar.polkadot]
endpoint = "wss://people-polkadot.dotters.network" # people system chain
registrar_index = 11 # your registrar index
keystore_path = "./keyfile_polkadot" # IdentityJudgement proxy private key
accountid = "1Ard..."  # registrar public key

[websocket]
host = "127.0.0.1"
port = 8080

[redis]
host = "redis"  # Use "redis" for Docker, "127.0.0.1" otherwise
port = 6379

[matrix]
homeserver = "https://matrix.beeper.com"
username = "regbot"
password = "your-password"
security_key = "EsTg A8Uh 9yFK 3uN1 16s6 WVDA gHLU kEid j9F1 iHt6 5V3u XSPs"
admins = ["@admin:matrix.org"]
Common Issues
- Redis Connection: Check if Redis is running and host configuration
- Matrix Login: Verify credentials and security key
- Permissions: Ensure proper file ownership and permissions under w3r user
Redis
We use Redis as a cache to maintain application statelessness in our Kubernetes setup. This allows us to scale horizontally while keeping track of ongoing verification challenges. If Redis data is lost, users simply need to restart their verification challenges.
Architecture Overview
The application uses Redis to temporarily store verification states and challenge tokens. This eliminates the need for local state management in application instances, making them stateless and easily scalable.
Data Structure
We use hash maps (HSET/HGETALL) with composite keys to store verification states and challenge data.
Key Structure
- Main verification state:
{network}:{account_address} - Media-specific state:
{network}:{account_address}:{media_type}
Main Verification State
HGETALL "polkadot:5GrwvaEF5zXb26Fz9rcQpDWS57CtERHpNehXCPcNoHGKutQY"
Fields:
status: Overall verification status (Done/Pending)created_at: Timestamp when verification process startedupdated_at: Timestamp of last status changemedia_types: Comma-separated list of media accounts being verified
Example:
{
    "status": "Pending",
    "created_at": "2024-01-11T22:25:36",
    "updated_at": "2024-01-11T22:26:36",
    "media_types": "discord,twitter,matrix"
}
Media-Specific State
HGETALL "polkadot:5GrwvaEF5zXb26Fz9rcQpDWS57CtERHpNehXCPcNoHGKutQY:discord"
Fields:
name: Username on the platformstatus: Verification status for this specific mediatoken: Verification token
Example:
{
    "name": "patchwinner",
    "status": "Pending",
    "token": "Q8KGYC7P"
}
Examples
Storing New Verification State
# Create main verification state
redis_client.hmset(f"{network}:{address}", {
    "status": "Pending",
    "created_at": datetime.utcnow().isoformat(),
    "updated_at": datetime.utcnow().isoformat(),
    "media_types": ",".join(media_types)
})

# Create media-specific state
redis_client.hmset(f"{network}:{address}:discord", {
    "name": username,
    "status": "Pending",
    "token": generate_token()
})
Retrieving Verification State
# Get main verification state
state = redis_client.hgetall(f"{network}:{address}")

# Get media-specific state
discord_state = redis_client.hgetall(f"{network}:{address}:discord")
Frontend
Frontend application for managing identity operations on polkadot-sdk chains.
The application enables users to submit setIdentity and requestJudgement operations using polkadot-api.
Features
- Identity registration on polkadot-sdk chains
- Integration with W3 Registrar backend
- Real-time verification status updates
- Support for multiple social account verifications
Development Setup
Prerequisites
Install required versions to ensure compatibility:
# Install Bun 1.1.35
curl -fsSL https://bun.sh/install | bash -s "bun-v1.1.35"

# Install NVM and Node 22
curl -o- https://raw.githubusercontent.com/nvm-sh/nvm/v0.40.0/install.sh | bash
nvm install 22
Installation
- Clone the repository:
git clone https://github.com/rotkoneworks/w3registrar-www
cd w3registrar-www
- Install dependencies:
bun install
- Set up environment:
cp .env.example .env
# Edit .env with your endpoints
- Update scale metadata:
bunx polkadot-api@1.8.0 update
# or
bun metadata
Development Server
Start the development server:
bun dev
Visit http://localhost:3333 in your browser. The server will automatically reload on file changes.
Building
Create production build:
bun build
Chain Documentation
- Access documentation at [docs link]
- Generate fresh documentation:
bunx papi-generate-docs --config .papi/polkadot-api.json --output docs/
Environment Configuration
Copy .env.example to .env and configure the following variables:
# WalletConnect Project ID
VITE_APP_WALLET_CONNECT_PROJECT_ID=rotko-w3-registrar

# Chain WebSocket Endpoints
VITE_APP_DEFAULT_WS_URL=wss://dev.rotko.net/people-rococo
VITE_APP_DEFAULT_WS_URL_RELAY=wss://dev.rotko.net/rococo

# Registrar Indices for Different Networks
VITE_APP_REGISTRAR_INDEX__PEOPLE_POLKADOT=19
VITE_APP_REGISTRAR_INDEX__PEOPLE_KUSAMA=17
VITE_APP_REGISTRAR_INDEX__PEOPLE_WESTEND=18
VITE_APP_REGISTRAR_INDEX__PEOPLE_PASEO=16
VITE_APP_REGISTRAR_INDEX__PEOPLE_ROCOCO=0

# API Configuration
VITE_APP_CHALLENGES_API_URL=wss://dev.rotko.net/api

# Chain Configuration
VITE_APP_AVAILABLE_CHAINS=polkadot_people,ksmcc3_people,paseo_people,rococo_people
VITE_APP_DEFAULT_CHAIN=rococo_people  # Optional
Available Scripts
bun dev: Start development serverbun build: Create production buildbun metadata: Update scale metadatabun docs: Generate chain documentation
Integration with Backend
The frontend expects a W3 Registrar backend instance running. Configure the WebSocket endpoint in your .env file:
VITE_BACKEND_URL="wss://your-backend:8080"
Registrar testnet
To install pop-cli for the testnet or use our deployed testnet, follow these steps:
1. Clone and Run the Pop-CLI
git clone https://github.com/rotkonetworks/pop-cli
cd pop-cli
cargo run up parachain --file ~/rotko/pop-cli/tests/networks/rococo+people.toml --verbose
2. Set WebSocket Endpoint
Use either the provided endpoint or your local testnet for people-rococo:
wss://dev.rotko.net/people-rococo
3. Generate Call Data
In the Polkadot UI, navigate to Extrinsics and create a transaction to add a registrar. Copy the calldata from the generated transaction.

Example transaction for call data extraction: Extrinsics decode tool
4. Relaychain Sudo Rights Requirement
Executing the above call from a local parachain account will fail due to lack of rights. You need sudo access at the relaychain level.
5. Create a Sudo Call on the Relaychain
Go to the relaychain’s Sudo page and submit a sudo call with the following XCM transaction:
#![allow(unused)]
fn main() {
xcmPallet::send(
    dest: XcmVersionedLocation::V4(StagingXcmV4Location {
        parents: 0,
        interior: StagingXcmV4Junctions::X1([Lookup71::Parachain(Compact(1004))])
    }),
    message: XcmVersionedXcm::V4(StagingXcmV4Xcm {
        0: StagingXcmV4Instruction::UnpaidExecution {
            weightLimit: XcmV3WeightLimit::Unlimited,
            checkOrigin: None
        },
        1: StagingXcmV4Instruction::Transact {
            originKind: XcmV3OriginKind::Superuser,
            requireWeightAtMost: SpWeightsWeightV2Weight {
                refTime: Compact(5000000000),
                proofSize: Compact(50000)
            },
            call: XcmDoubleEncoded::new(Bytes::from_hex("0x3200001cbd2d43530a44705ad088af313e18f80b53ef16b36177cd4b77b846f2a5f07c"))
        }
    })
);
}
Submit this sudo call as Alice (the first validator in the network):

6. Verify Registrar Creation
Watch the Explorer for events confirming the registrar was created on the parachain (people-rococo).
Secure Registrar Setup Guide
Core Architecture
The registrar setup consists of three key components:
- Pure Proxy (Main Registrar) - controlled by multisig, stays cold
- Multisig - for governance and critical operations only
- Identity Judgement Proxy - hot wallet for registrar operations
When to Use Multisig
Multisig is required ONLY for these critical operations:
- Requesting registrar rights via governance for the pure proxy
- Setting supported bitflags (declaring which identity fields you verify)
- Setting up new Identity Judgement proxy
All other operations should use the Identity Judgement proxy.
Operational Flow
Initial Setup
- Create pure proxy (will be your registrar address)
- Set up multisig (minimum 3/5 recommended)
- Request registrar rights via governance
- Set supported identity verification bitflags
- Create Identity Judgement proxy for server operations
Daily Operations
- Identity Judgement proxy runs on server
- Provides actual judgements
- Main registrar (pure proxy) stays cold
- No multisig needed for routine judgements
Security Model
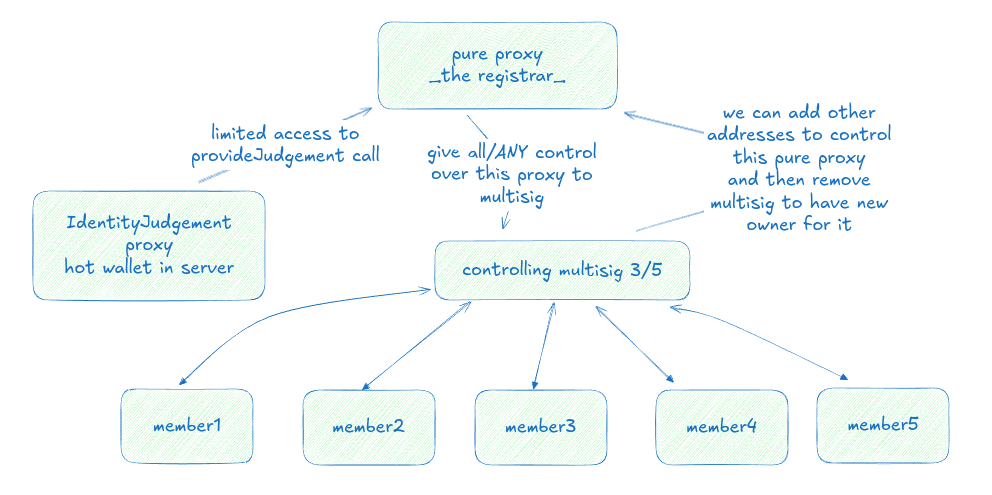
The diagram shows the complete security setup:
- Pure proxy at the top serves as the registrar
- Controlled by a 3/5 multisig
- Identity Judgement proxy connected to server hot wallet
- Members 1-5 participating in multisig operations
- Ownership of registrar can be assigned to new wallet/multisig
Transaction Review
CRITICAL: Always verify transactions on Polkadot.js Apps:
1. Visit: https://polkadot.js.org/apps/?rpc=wss%3A%2F%2Fpeople-paseo.dotters.network#/extrinsics
2. Go to 'Decode' section
3. Paste raw transaction (e.g., 0x2a0400000000000000)
4. Verify ALL parameters
5. When sharing multisig calldata, send extrinsics link for easier verification
Multisig Changes
IMPORTANT: Multisig membership cannot be changed once created. To handle member changes:
- Create entirely new multisig with desired members
- Use old multisig to give control rights to new multisig over pure proxy
- Use new multisig to remove old multisig's rights
This is why we use pure proxy as registrar - it allows changing the controlling multisig while maintaining the same registrar identity.
Common Operations
Setting Up Judgement Proxy
- Create new proxy for Identity Judgement
- Use multisig to authorize it
- Verify setup via transaction decode
Providing Judgements
- Use Identity Judgement proxy
- No multisig required
- Server can operate autonomously
Changing Supported Fields
- Requires multisig
- Update bitflags via pure proxy
- Verify via transaction decode
Identity Verification System
1. Overview
The identity verification system consists of registrars who verify specific fields of user identities. The system uses bitflags to specify verification fields and proxies for secure operation.
2. Identity Fields and Bitflags
Field Positions
Each identity field corresponds to a specific bit position in a binary number:
Position | Field         | Binary Value      | Decimal Value
---------|--------------|-------------------|---------------
9        | Discord      | 0b1000000000      | 512
8        | GitHub       | 0b0100000000      | 256
7        | Twitter      | 0b0010000000      | 128
6        | Image        | 0b0001000000      | 64
5        | PgpFingerprint| 0b0000100000     | 32
4        | Email        | 0b0000010000      | 16
3        | Matrix       | 0b0000001000      | 8
2        | Web          | 0b0000000100      | 4
1        | Legal        | 0b0000000010      | 2
0        | Display      | 0b0000000001      | 1
Common Combinations
Standard Verification (665):
Discord + Twitter + Email + Matrix + Display
1010011001 = 512 + 128 + 16 + 8 + 1 = 665
3. Setting Up a Registrar
Setting Fields
#![allow(unused)]
fn main() {
identity.setFields(registrarIndex, fields)
}
Example:
identity.setFields(0, 665) // Sets registrar 0 to verify Display, Matrix, Email, Twitter, Discord
Field Validation
- Chain automatically blocks judgment requests that don't match registrar's fields
- All specified fields must be present in identity information
- Extra fields are ignored for verification purposes
4. Proxy System
Setting Up Proxy
#![allow(unused)]
fn main() {
proxy.addProxy(delegate, proxyType, delay)
}
Parameters:
delegate: Hot wallet address for making judgmentsproxyType: IdentityJudgementdelay: 0 (no delay for judgments)
Proxy Types Available
#![allow(unused)]
fn main() {
pub enum ProxyType {
    Any,               // Full permissions
    NonTransfer,       // Non-financial calls
    CancelProxy,       // Cancel proxy announcements
    Identity,          // All identity calls
    IdentityJudgement, // Only judgment calls
    Collator          // Collator selection calls
}
}
5. Judgment Process
Available Judgments
#![allow(unused)]
fn main() {
pub enum Judgement {
    Unknown,            // 0
    FeePaid(u128),     // 1 - Judgement Requested from registrar(index)
    Reasonable,        // 2 - Standard positive judgment
    KnownGood,         // 3
    OutOfDate,         // 4
    LowQuality,        // 5
    Erroneous         // 6 - Used for failed verifications
}
}
Making Judgments via Proxy
#![allow(unused)]
fn main() {
proxy.proxy(
    registrarAccount,
    Some(IdentityJudgement),
    identity.provideJudgement(regIndex, target, judgement, identityHash)
)
}
6. Security Considerations
Chain-Level Security
- Automatic field validation
- Proxy system limits exposure of registrar account
- Identity hash changes trigger new verification requirements
Best Practices
- Use cold storage for main registrar account
- Set up proxy for daily operations
- Regularly verify proxy permissions
- Monitor identity hash changes
7. Implementation Example
Standard Setup Process
- Get registered as a registrar
- Set verification fields:
identity.setFields(registrarIndex, 665) - Set up proxy:
proxy.addProxy(hotWalletAddress, IdentityJudgement, 0) - Use hot wallet for judgments:
proxy.proxy(registrarAccount, Some(IdentityJudgement),
           identity.provideJudgement(...))
Field Verification
The system automatically ensures:
- All required fields are present
- Fields match registrar's bitflag specification
- Identity hash consistency
- Proper proxy permissions
8. Important Notes
- Identity hashes change when verified fields are modified
- Only specified fields are considered for verification
- Proxy permissions cannot be exceeded
- Chain enforces all validation rules
- Registrar must handle both successful (Reasonable) and failed (Erroneous) cases
FAQ
Q: Why are we facing M_UNKNOWN error 500 from the Matrix Synapse server?
Error Details
2025-01-11T03:47:38.385306Z ERROR w3registrar::matrix: 178: can't sync duo to Http(
    Api(
        Server(
            ClientApi(
                Error {
                    status_code: 500,
                    body: Standard {
                        kind: Unknown,
                        message: "synapse sync failed with status 400 Bad Request: internal error generating sync response",
                    },
                },
            ),
        ),
    ),
)
Answer
This error can occur if your account has exceeded the usual limit of 20 active
Device IDs. When this happens, the server may fail to handle /sync requests
due to the overhead of managing too many devices.
How to Check for Too Many Devices
Use the following curl command to list all Device IDs associated with your account:
curl -v "https://matrix.beeper.com/_matrix/client/v3/devices" \
-H "Authorization: Bearer <your_access_token>"
Example response:
{
  "devices": [
    {"device_id": "AEQJNOWHXG", "display_name": "Beeper Desktop (Linux)", "last_seen_ip": "", "last_seen_ts": 1730201177000},
    {"device_id": "BGKCFSZTRN", "display_name": "Beeper Desktop (Linux)", "last_seen_ip": "", "last_seen_ts": 1733668251000},
    {"device_id": "BVKAPCXANW", "display_name": "w3r", "last_seen_ip": "", "last_seen_ts": 1736377586000},
    ...
  ]
}
Solution: Remove Unnecessary Devices
Identify and remove devices that are no longer in use. Focus on devices with:
- A
last_seen_tsof0or very old timestamps. - Duplicate or generic display names.
Example Cleanup
To remove specific devices, use the /delete_devices endpoint:
curl -X POST "https://matrix.beeper.com/_matrix/client/v3/delete_devices" \
-H "Authorization: Bearer <your_access_token>" \
-H "Content-Type: application/json" \
-d '{
  "devices": ["FJHQEVOVOD", "KSQHECIAAA", "KZIRBZPAHB"]
}'
If required, include authentication:
curl -X POST "https://matrix.beeper.com/_matrix/client/v3/delete_devices" \
-H "Authorization: Bearer <your_access_token>" \
-H "Content-Type: application/json" \
-d '{
  "devices": ["FJHQEVOVOD", "KSQHECIAAA", "KZIRBZPAHB"],
  "auth": {
    "type": "m.login.password",
    "user": "@w3r:beeper.com",
    "password": "your_password"
  }
}'
Verify Cleanup
After removing devices, verify the remaining devices:
curl -v "https://matrix.beeper.com/_matrix/client/v3/devices" \
-H "Authorization: Bearer <your_access_token>"
Prevent Future Issues
- Reuse Existing Tokens: Avoid logging into the same account unnecessarily.
- Logout Unused Sessions: Regularly clean up old sessions.
- Monitor Active Devices: Periodically review the list of active devices to ensure it stays manageable.
By keeping the number of active Device IDs below the limit, you can avoid these errors and ensure smoother synchronization with the Matrix server.
Support
Thank you for using W3 Registrar! If you need assistance, feel free to contact us or explore our resources below.
Contact Information
- Matrix Chat
Join our support channel on Matrix for real-time assistance:
#w3reg:matrix.org
Resources
-
GitHub Repositories
Explore our source code, documentation, and issue trackers on GitHub: -
Documentation
Find guides and references in our official documentation:
https://w3reg.org/docs -
Issue Tracking
Report bugs or request features in the respective GitHub repositories above.
We’re here to support you and make your experience with W3 Registrar seamless!